更新记录
首页改造:hexo-magnet 插件引入,梳理个人文章分类
首页改造:Github数据统计、轮播图、双栏布局、天气插件等内容
hexo-butterfly-首页改造
1.Github贡献图表
构建步骤
参考githubchart-api,通过img方式引入
1
| <img src="https://ghchart.rshah.org/2016rshah" alt="2016rshah's Github chart" />
|
构建步骤:可参考Akilar原博
<1>引入hexo-filter-gitcalendar
1
| npm install hexo-filter-gitcalendar --save
|
<2>配置主配置文件,引入gitcalendar配置
1
2
3
4
5
6
7
8
9
10
11
12
13
14
15
16
17
18
19
|
gitcalendar:
enable: true
priority: 5
enable_page: all
layout:
type: id
name: recent-posts
index: 0
user: Akilarlxh
apiurl: 'https://gitcalendar.akilar.top'
minheight:
pc: 280px
mibile: 0px
color: "['#e4dfd7', '#f9f4dc', '#f7e8aa', '#f7e8aa', '#f8df72', '#fcd217', '#fcc515', '#f28e16', '#fb8b05', '#d85916', '#f43e06']"
container: .recent-post-item(style='width:100%;height:auto;padding:10px;')
gitcalendar_css: https://unpkg.zhimg.com/hexo-filter-gitcalendar/lib/gitcalendar.css
gitcalendar_js: https://unpkg.zhimg.com/hexo-filter-gitcalendar/lib/gitcalendar.js
|
基于Vercel自建API构建引用的是:python-github-calendar-api
挂载容器配置说明
不同主题挂载容器不同,根据应用主题进行配置即可
| layout参数配置(挂载容器)/主题 |
butterfly |
volantis |
matery |
mengd |
| type |
id |
class |
id |
class |
| name |
recent-posts |
l_main |
indexCard |
content |
| index |
0 |
0 |
0 |
0 |
| 色调 |
参数 |
| 橘黄色调 |
“[‘#e4dfd7’, ‘#f9f4dc’, ‘#f7e8aa’, ‘#f7e8aa’, ‘#f8df72’, ‘#fcd217’, ‘#fcc515’, ‘#f28e16’, ‘#fb8b05’, ‘#d85916’, ‘#f43e06’]” |
| 浅紫色调 |
[‘#ebedf0’, ‘#fdcdec’, ‘#fc9bd9’, ‘#fa6ac5’, ‘#f838b2’, ‘#f5089f’, ‘#c4067e’, ‘#92055e’, ‘#540336’, ‘#48022f’, ‘#30021f’] |
| 翠绿色调 |
[‘#ebedf0’, ‘#f0fff4’, ‘#dcffe4’, ‘#bef5cb’, ‘#85e89d’, ‘#34d058’, ‘#28a745’, ‘#22863a’, ‘#176f2c’, ‘#165c26’, ‘#144620’] |
| 天青色调 |
[‘#ebedf0’, ‘#f1f8ff’, ‘#dbedff’, ‘#c8e1ff’, ‘#79b8ff’, ‘#2188ff’, ‘#0366d6’, ‘#005cc5’, ‘#044289’, ‘#032f62’, ‘#05264c’] |
2.首页轮播图引入
构建步骤
<1>插件安装hexo-butterfly-swiper
1
| npm install hexo-butterfly-swiper --save
|
<2>主配置文件中引入轮播图插件
1
2
3
4
5
6
7
8
9
10
11
12
13
14
15
16
|
swiper:
enable: true
priority: 5
enable_page: all
timemode: date
layout:
type: id
name: recent-posts
index: 0
default_descr:
swiper_css: https://unpkg.zhimg.com/hexo-butterfly-swiper/lib/swiper.min.css
swiper_js: https://unpkg.zhimg.com/hexo-butterfly-swiper/lib/swiper.min.js
custom_css: https://unpkg.zhimg.com/hexo-butterfly-swiper/lib/swiperstyle.css
custom_js: https://unpkg.zhimg.com/hexo-butterfly-swiper/lib/swiper_init.js
|
点击查看参数配置说明
| 参数 |
备选值/类型 |
释义 |
| priority |
number |
【可选】过滤器优先级,数值越小,执行越早,默认为10,选填 |
| enable |
true/false |
【必选】控制开关 |
| enable_page |
path/all |
【可选】填写想要应用的页面的相对路径(即路由地址),如根目录就填’/‘,分类页面就填’/categories/‘。若要应用于所有页面,就填’all’,默认为all |
| exclude |
path |
【可选】填写想要屏蔽的页面,可以多个。仅当enable_page为’all’时生效。写法见示例。原理是将屏蔽项的内容逐个放到当前路径去匹配,若当前路径包含任一屏蔽项,则不会挂载。 |
| timemode |
date/updated |
【可选】时间显示,date为显示创建日期,updated为显示更新日期,默认为date |
| layout.type |
id/class |
【可选】挂载容器类型,填写id或class,不填则默认为id |
| layout.name |
text |
【必选】挂载容器名称 |
| layout.index |
0和正整数 |
【可选】前提是layout.type为class,因为同一页面可能有多个class,此项用来确认究竟排在第几个顺位 |
| error_img |
url |
封面图片加载失败时的替换图片 |
| insertposition |
text |
‘beforebegin’:元素自身的前面。’afterbegin’:插入元素内部的第一个子节点之前。’beforeend’:插入元素内部的最后一个子节点之后。’afterend’:插入元素自身的后面。 |
| default_descr |
text |
【可选】默认文章描述 |
| swiper_css |
url |
【可选】自定义的swiper依赖项css链接 |
| swiper_js |
url |
【可选】自定义的swiper依赖项加js链接 |
| custom_css |
url |
【可选】适配主题样式补丁 |
| custom_js |
url |
【可选】swiper初始化方法 |
<3>修改文章模板/scaffolds/post.md,在front-matter中引入swiper_index参数(非负整数,值越大越靠前)
针对可以选择性配置需要显示在首页的内容
1
2
3
4
5
6
7
8
9
| # 文章模板参考
---
title: 文章标题
date: 创建日期
updated: 更新日期
cover: 文章封面
description: 文章描述
swiper_index: #置顶轮播图顺序,需填非负整数,数字越大越靠前
---
|
3.双栏布局插件引入
双栏布局引入参考文章
构建步骤
<1>插件装载:hexo-butterfly-article-double-row
1
2
| # 插件装载
npm i hexo-butterfly-article-double-row --save
|
<2>配置主配置文件,引入butterfly_article_double_row配置
1
2
| butterfly_article_double_row:
enable: true
|
<3>配置完成重启查看效果
1
| hexo clean & hexo g & hexo s
|
4.天气插件引入
构建步骤
<1>注册免费的天气预告组件:心知天气、和风天气开发平台
具体价格方案可参考官网说明,择优选择
<2>创建天气插件(生成相关的JS文件)
个人以和风天气为参考进行调整,注册登录->进入控制台,自定义创建插件
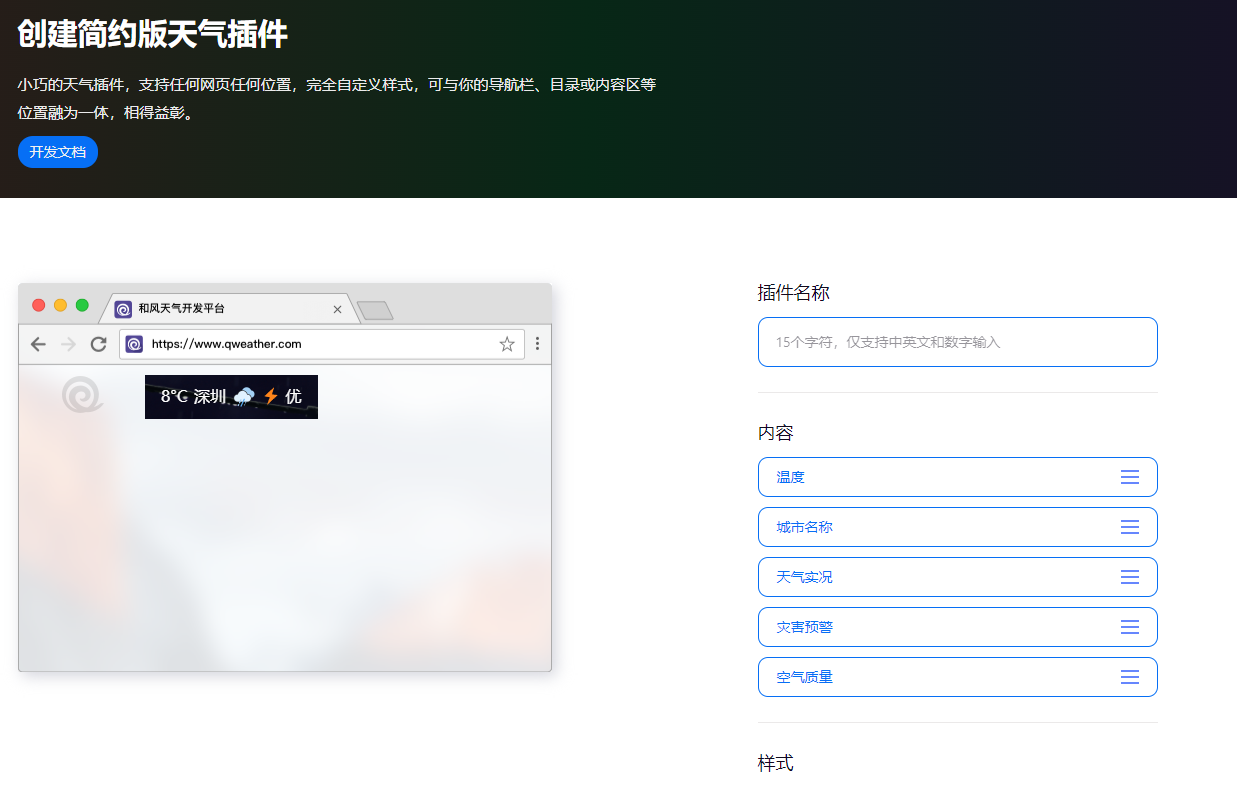
参数配置完成则选择“生成代码”选项,代码示例参考如下。
1
2
3
4
5
6
7
8
9
10
11
12
13
14
15
16
17
18
19
20
21
22
23
24
25
| <div id="he-plugin-simple"></div>
<script>
WIDGET = {
"CONFIG": {
"modules": "01234",
"background": "1",
"tmpColor": "FF9900",
"tmpSize": "16",
"cityColor": "CFE2F3",
"citySize": "16",
"aqiColor": "DD7E6B",
"aqiSize": "16",
"weatherIconSize": "24",
"alertIconSize": "18",
"padding": "10px 10px 10px 10px",
"shadow": "0",
"language": "auto",
"fixed": "false",
"vertical": "center",
"horizontal": "center",
"key": "key"
}
}
</script>
<script src="https://widget.qweather.net/simple/static/js/he-simple-common.js?v=2.0"></script>
|
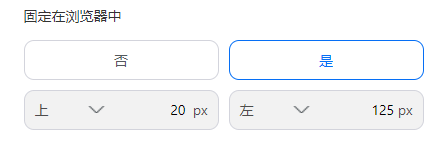
可结合窗口进行调试,主要注意的是相对位置的调节,对应选择固定在浏览器中,随后大致控制其与导航栏的站点标题的相对距离即可(最好通过F12窗口进行适配调节,主要是修改CONFIG中的left、top配置即可)
<3>修改主题文件内容
- 在
\themes\butterfly\layout\includes\headers 目录下的 nav.pug 文件中配置装载组件
1
2
3
4
| # html写法
<div id="he-plugin-simple"></div>
# pug写法
#he-plugin-simple
|
将上述文件的script中的代码段写入自定义的hf_weather.js,随后在主题配置文件中inject配置注入自定义的hf_weather.js和官方提供的he-simple-common.js
1
2
3
4
| inject:
bottom:
- <script src="https://widget.qweather.net/simple/static/js/he-simple-common.js?v=2.0"></script>
- <script async src="/js/hf_weather.js"></script>
|
- hexo三连启动查看插件位置是否适配,进行适当调整
<4>后续维护
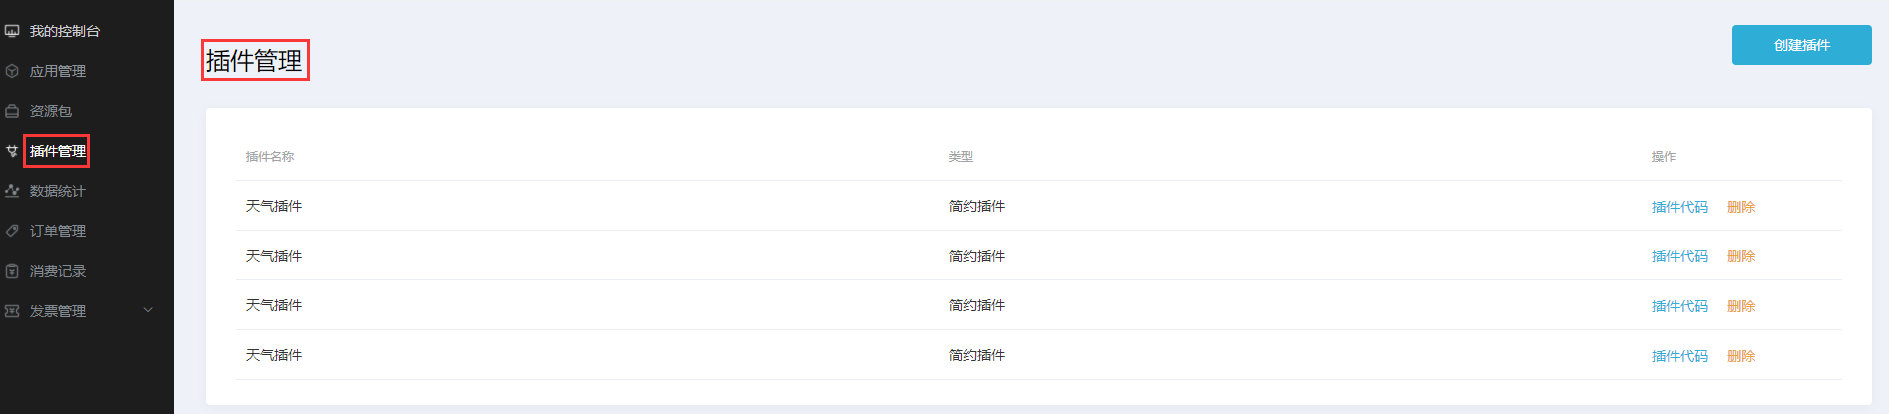
进入和风天气控制台,选择插件管理可查看自定义的插件内容,还可通过其他模块查看数据访问情况
5.hexo-magnet插件引入
最近正在把之前的一些碎碎念文章清理一波,顺便对文章进行一个比较清晰的分类,本篇参考小冰博客的hexo-magnet教程作说明,其主要步骤简述如下所示:
1
2
3
4
|
1.引入hexo-magnet插件
2.配置主配置文件_config.yml
3.hexo三连启动测试
|
引入hexo-magnet插件
1
| npm/cnpm i hexo-magnet --save
|
配置主配置文件_config.yml
1
2
3
4
5
6
7
8
9
10
11
12
13
14
15
16
17
18
19
20
21
| magnet:
enable: true
priority: 1
enable_page: /
type: categories
devide: 2
display:
- name: 教程
display_name: 小冰の魔改教程
icon: 📚
color_setting:
text_color: black
text_hover_color: white
background_color: "#f2f2f2"
background_hover_color: "#b30070"
layout:
type: id
name: recent-posts
index: 0
temple_html: '<div class="recent-post-item" style="width:100%;height: auto"><div id="catalog_magnet">${temple_html_item}</div></div>'
plus_style: ""
|
参数说明
1
2
3
4
5
6
7
8
| <div name="我是墙" id="recent-posts">
<div name="我是画框">
<div name="我是纸">
</div>
</div>
</div>
|