hexo-butterfly-样式修改
1.自定义样式引入
将自定义css挂载为外部链接,通过inject引入
<1>自定义css文件(css配置中相关内容引入均采用外链方式挂载),简单示例如下(字体引用配置)
1
2
3
4
5
6
7
8
9
10
11
12
13
14
|
@font-face{
font-family:'xxxFont' ;
src:url('https://cdn.jsdelivr.net/gh/username/repoName/path/xxx.ttf');
font-display: swap;
}
body,
html{
font-family: 'xxxFont','xxxFont', cursive;
font-size: 18px;
}
|
<2>将css文件上传到cdn服务中,配置主题配置文件inject
- head对应为css文件外链引入,bottom对应为js文件外链引入
1
2
3
4
5
| inject:
head:
- <link rel="stylesheet" href="https://cdn.jsdelivr.net/gh/username/repoName/path/xxx.css">
bottom:
|
基于这种方式构建的话涉及butterfly源码修改(即将自定义文件中整合到butterfly提供的index中),需要在index.styl中引入,若后续项目主题迭代升级如果版本处理不好的话很容易把自己的样式覆盖掉,不利于维护升级,建议通过外链挂载的方式引入自定义css
自定义样式整合构建思路说明
<1>项目根路径\themes\butterfly\source\css\存放自定义css(可自定义分类),对应相关资源文件采用相对路径进行引入
1
2
3
4
| # 项目根路径\themes\butterfly\source\css\
|-- css
|-- _custom
|-- xxx.css
|
<2>项目根路径\themes\butterfly\source\css\index.styl中引入自定义的css文件(为避免样式覆盖,放在最下面进行定义),也可在此引入外链css
1
2
3
4
5
|
@import '_custom/*.css'
@import 'https://cdn.jsdelivr.net/gh/username/repo/css/xxx.css'
|
<3>执行:每次执行hexo g指令会将项目中的css文件整合到index.css中(CDN加速:可在主题配置文件中给index.css配置CDN缓存,提升加载速度)
样式调试tip
a.元素隐藏
元素隐藏
可通过F12窗口编写元素属性进行调试
1
2
3
4
5
| #hide_element{
display: none!important;
visibility: hidden;
opacity: 0;
}
|
b.透明度
透明度
background:rgba(255,255,255,0.5)
background 配置页面元素背景变得透明,而不会对这一页面元素下的其他元素 (包括 div、span、p、a 等任何标签) 有任何影响。一般用来对文章内容或页面卡片添加透明度。这样可以保证字体不会变透明
1
2
3
4
5
6
7
8
9
10
11
12
13
14
15
16
17
18
19
20
21
22
23
24
25
26
27
28
|
#recent-posts > .recent-post-item{
background:rgba(255, 255, 255, 0.9);
}
.card-widget{
background:rgba(255, 255, 255, 0.9)!important;
}
div#post{
background: rgba(255, 255, 255, 0.9);
}
div#page{
background: rgba(255, 255, 255, 0.9);
}
div#archive{
background: rgba(255, 255, 255, 0.9);
}
div#tag{
background: rgba(255, 255, 255, 0.9);
}
div#category{
background: rgba(255, 255, 255, 0.9);
}
|
opacity 定义的是全局的透明度,会影响添加该属性的页面元素及其下属元素
1
2
3
| #footer{
opacity: 0.5;
}
|
此处参考akilar大大的一图流方案,设定默认的全局背景图,随后配置css样式构建一图流(头图、页脚全透明)
一图流构建
<1>配置主题配置文件_config.butterfly.yml
<2>自定义样式引入配置
1
2
3
4
5
6
7
8
9
10
11
12
13
14
15
16
17
18
19
20
21
22
23
24
25
|
#footer{
background: transparent!important;
}
#footer::before{
background: transparent!important;
}
#page-header{
background: transparent!important;
}
#page-header.post-bg:before {
background-color: transparent!important;
}
[data-theme="dark"]
#footer::before{
background: transparent!important;
}
[data-theme="dark"]
#page-header::before{
background: transparent!important;
}
|
2.字体样式修改
字体引用参考:谷歌字体库,选择、预览字体,可查看API引用链接和font-family

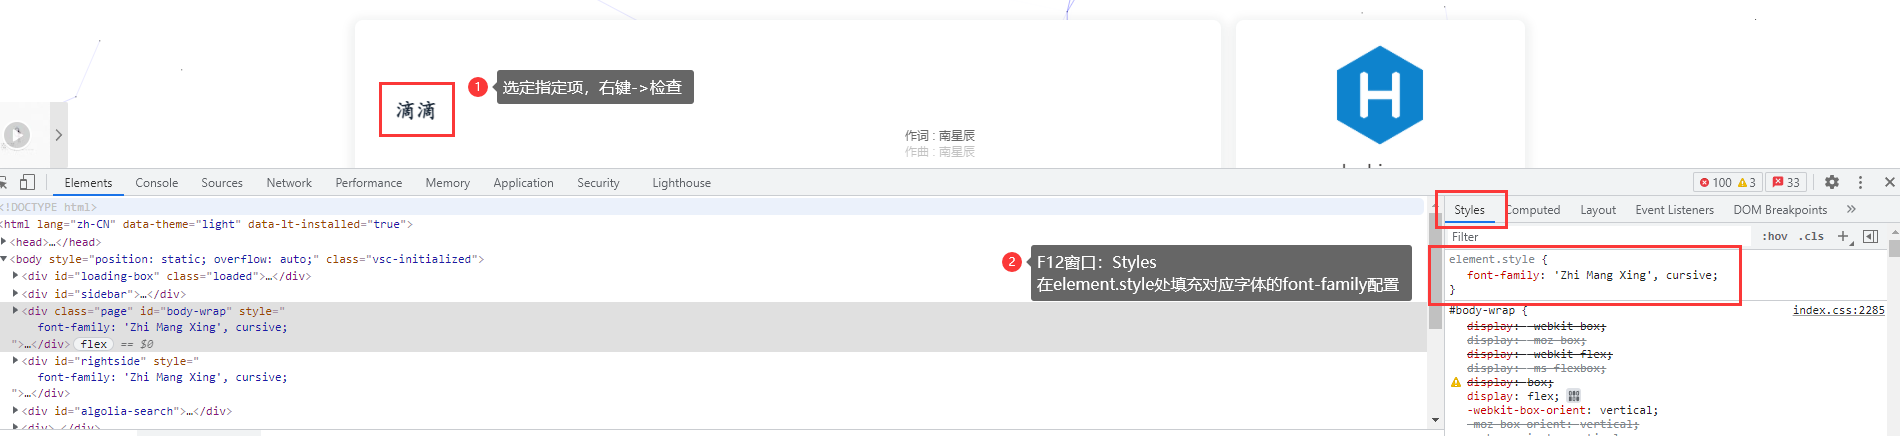
F12方式调试预览
自定义CSS引入
- 自定义custom.css配置字体样式,通过@import方式引入
1
2
3
4
5
6
| # 配置自定义CSS,针对一些指定样式修改则在页面中选中element配置进行预览,引入方式参考
@import url('https://fonts.googleapis.com/css2?family=Zhi+Mang+Xing&display=swap');
h1#site-title {
font-family: 'Zhi Mang Xing', cursive;
}
|
字体引用参考:第一字体网、自由字体
下载字体样式文件,将文件存放在/source指定字体包下(可自定义分类),随后在自定义css文件中加载字体文件
1
2
3
4
5
6
7
8
9
10
11
|
@font-face{
font-family:'SudestadaFont' ;
src:url('/wv-blog/font/Sudestada.ttf');
font-display: swap;
}
h1#site-title {
font-family:'SudestadaFont' ;
}
|
3.鼠标样式修改
鼠标指针样式修改:对应板块的curcor属性(.cur静态指针鼠标、.ani动态指针鼠标)
鼠标样式参考:致美化
在自定义css文件中对应元素配置cursor属性引用静态指针鼠标(可采用cdn方式),文件内容可参考下述
1
2
3
4
5
6
7
8
9
10
11
12
13
14
15
16
17
18
19
20
21
22
23
24
25
26
27
28
29
30
31
32
33
34
35
36
37
|
body,
html{
cursor: url('指定样式cur文件路径'),auto !important;
}
img{
cursor: url('指定样式cur文件路径'),auto !important;
}
a:hover{
cursor: url('指定样式cur文件路径'),auto;
}
input:hover{
cursor: url('指定样式cur文件路径'),auto;
}
button:hover{
cursor: url('指定样式cur文件路径'),auto;
}
i:hover{
cursor: url('指定样式cur文件路径'),auto;
}
#footer-wrap a:hover{
cursor: url('指定样式cur文件路径'),auto;
}
#pagination .page-number:hover{
cursor: url('指定样式cur文件路径'),auto;
}
#nav .site-page:hover{
cursor: url('指定样式cur文件路径'),auto;
}
|
为了省略下载的文件前缀,可借助utools批量处理工具对下载的cur包进行批量重命名处理(选中要进行重命名操作的文件列表->按鼠标中键点击“重命名”->根据指定规则批量处理)

4.徽章引入
页脚自定义
可以在两处调整页脚内容定义,一种是主题配置文件中_config.butterfly.yml直接配置footer属性,另一种则是修改源码的形式调整footer.pug文件内容
<% tabs 页脚修改 %>
1
2
3
4
5
| footer:
owner:
enable: true
since:
custom_text:
|
修改themes/butterfly/layout/includes/footer.pug,里面是对页脚的完整定义
1
2
3
4
5
6
7
8
9
10
11
12
13
14
15
16
17
18
| #footer-wrap
if theme.footer.owner.enable
- var now = new Date()
- var nowYear = now.getFullYear()
if theme.footer.owner.since && theme.footer.owner.since != nowYear
.copyright!= `©${theme.footer.owner.since} - ${nowYear} By ${config.author}`
else
.copyright!= `©${nowYear} By ${config.author}`
if theme.footer.copyright
.framework-info
- 框架主题信息
- span= _p('footer.framework') + ' '
- a(href='https://hexo.io')= 'Hexo'
- span.footer-separator |
- span= _p('footer.theme') + ' '
- a(href='https://github.com/jerryc127/hexo-theme-butterfly')= 'Butterfly'
if theme.footer.custom_text
.footer_custom_text!=`${theme.footer.custom_text}`
|
<% endtabs %>
徽章引入
徽章生成可以通过shield.io生成,选定内容,指定生成规则即可

备案信息图标生成参考
1
| https://img.shields.io/badge/xICP备-xxxxxx--1-yellowgreen
|
5.404页面美化
编辑路径blog项目/themes/butterfly/layout/includes/404.pug
6.标签样式修改
编辑\themes\butterfly\scripts\helpers\page.js,定位绘制标签云的代码,增加绘制标签云的代码,添加相应的上下标<sup>${tag.length}</sup>,随后hexo三连重启测试
1
2
3
4
5
6
7
8
9
| hexo.extend.helper.register('cloudTags', function (options = {}) {
......
source.forEach(tag => {
......
- result += `<a href="${env.url_for(tag.path)}" style="${style}">${tag.name}</a>`
+ result += `<a href="${env.url_for(tag.path)}" style="${style}">${tag.name}<sup>${tag.length}</sup></a>`
})
return result
})
|